CAN-ISO with CANHacker graphic interface
Category : CAN-BUS PROJECTS
In this section we will see how to make an “Universal isolated galvanic CAN BUS monitor” using Arduino with a CAN-ISO shield (RubinoLab) and a graphic interface CANHacker.
A complete professional device for all CAN-BUS protocols, from the automotive to the industrial sector.
A CAN network device that allows to write / read on CAN-bus to perform operations such as diagnostics, analyze network traffic, identify network problems, etc. For example:
In the automotive sector: it can be used to read the error codes of the cars, motorcycles, etc. that use OBD-II, or carry out operations of “CAN Bus Reverse Engineering” by monitoring the exchange of CAN data between engine side units, or send commands to reset error codes, perform bench tests of individual subsystems, etc
In the industry: with network monitoring you can help managers of a CAN network to identify whether a network is working normally or is congested. In addition, bottlenecks can be identified within a network to identify and improve performance with upgrades to the infrastructure.
Identification of problems: As mentioned above, in addition to reading / writing to CAN you can identify all the problems related to the network. By reading the information acquired by the sniffer it is possible to identify the wrong packets and / or identify the node that has not responded to the requests. This facilitates the identification of defective devices within the network efficiently and provides the ability to take quick corrective actions.
Here’s what you need
Buy the hardware:
- ARDUINO UNO (or equivalent)
- CAN-ISO (Shield CAN-BUS galvanically isolated for Arduino platform)
Download the software:
- Arduino canbus monitor (sketch for platform Arduino)
- CANHacker tool v.2.00.02 (graphic interface windows)
Now we are ready to start!
Features
Before installation, let’s see what they are and what they do “Arduino canbus monitor” and “CANHacker tool”.
The sketch “Arduino canbus monitor”, implements CAN ASCII/SLCAN protocol compatible with Lawicel CAN232/CANUSB. It can be used for monitoring a large part of CAN protocols. Note: For CAN speeds exceeding 500kbps with a high data density on the serial port of Arduino, the serial port can become a bottleneck.
The graphic interface windows “CANHacker tool” of (Lawicel) can be interfaced to “Arduino canbus monitor”. It implements communication CAN with:
- send & receive Can Frames
- supports standard (11 bit) & extended (29 bit) frames
- supports remote frames (RTR)
- supports filter by ID (mask + code)
- supported can baudrates from 10Kbps up to 1Mbps
- support MCP2515 @ 16 MHZ
Now we will see step by step how to install the software “Arduino canbus monitor” and “CANHacker tool”.
Installation
Now we can start using ours “sniffer” or “monitor canbus”.
- Connect the CAN Device (Arduino+CAN-ISO shield) to PC. Wait for Windows assign a COM serial port number. Check the serial port number assigned by windows in “device management”.
- Start the software CANHacker, and in “Setting” choose:
- CAN Device: the COM port assigned to Arduino from windows
- COM Baudrate: 115200 bits/s
- CAN Baudrate: CAN port speed
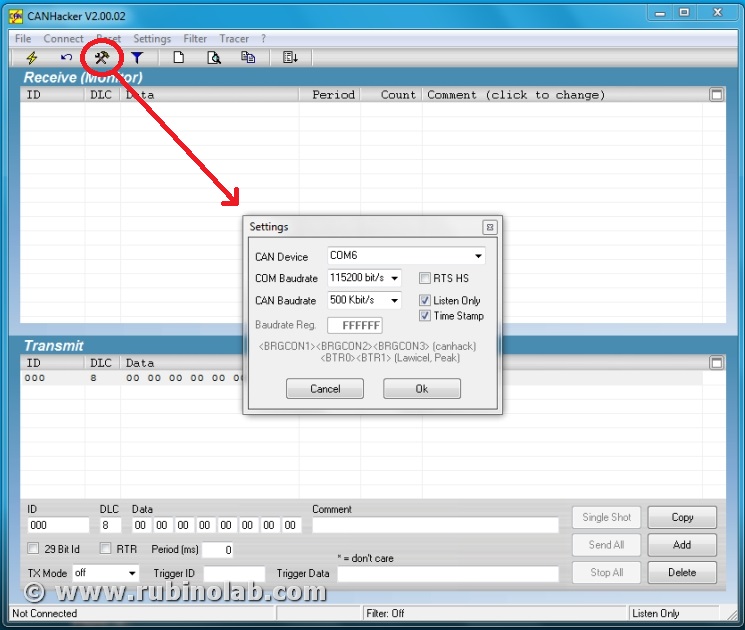
Click on the button “OK”, then “Connect”. Have fun! Monitor your Can bus, save traces, send messages, do what your analyzer/visualizer software can.
EXAMPLE 01
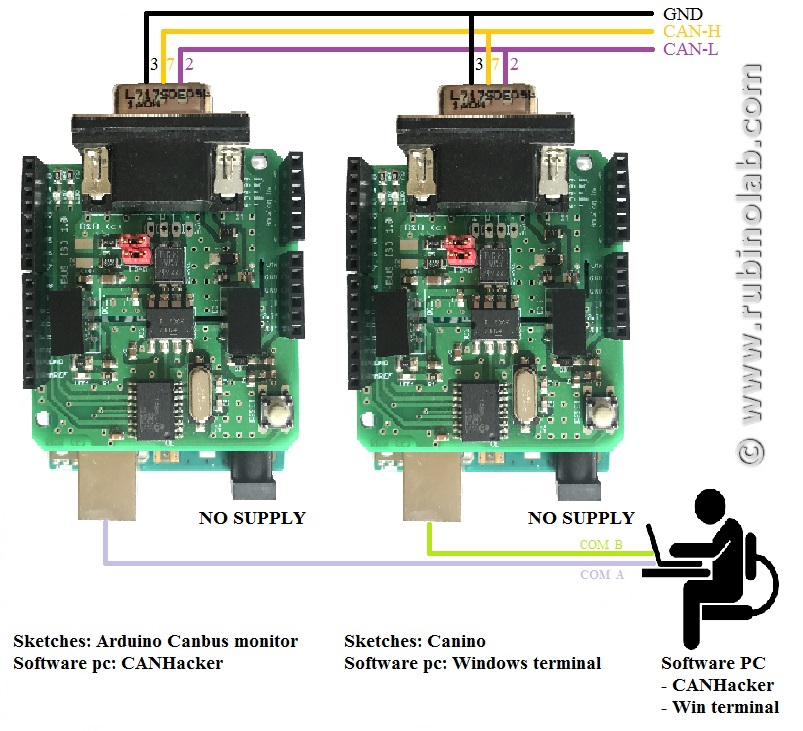
In this test we will carry out Canbus communication tests between two “Arduino UNO” boards with “CAN-ISO” shields.
For the test we need:
(2) boards “ARDUINO UNO”
(2) Shields “CAN-ISO”
(1) cable Canbus
In order to use the same PC to read/write on the Canbus, we will use a “Windows terminal” and “CANHacker” as graphic interfaces.
As result, the download sketches on the first Arduino board is “CANINO”, in the second “Arduino canbus monitor”
Download CANINO
Download Arduino canbus monitor
Now launch the terminal:
CANHacker: configure the COM port, CAN speed (for board with Arduino canbus monitor);
CANINO: configure the COM port, CAN speed (for board with Canino);
In the figure, for example, we can see the sending of the string @00A0102030405060708 from “Windows terminal” of CAN to “CANHacker”.

Conclusions
With this solution we will have a complete tool, galvanically isolated for multiple uses, at low cost.
Contact us to let us know your opinions: info(at)rubinolab dot com
Enjoy!